Blog Archives

Access private Gitlab repo with Composer

To access a project (like a library) on a private repository within your own Gitlab server, it is necessary to configure Composer right. First add the repository to the composer.json file of the current project (where you need the library code):

{
"repositories": [{
"type": "gitlab",
"url": "https://gitlab.yourserver.com/user/project.git" }]

The type “gitlab” activates some more configuration properties for Composer. So you have to define your private Gitlab server as valid server within Composer:

composer config --global gitlab-domains "gitlab.yourserver.com"

The –global flag stores the property within ~/.config/composer/config.json (OpenSuse 15.2). It will be activate for every Composer project on the computer.

If your repository is only visible after the login with a user/password, you must generate a unique token within the GitLab. Log into the GitLab UI with your username/password and choose “Preferences”->”Access Tokens”. There you can enter an application name like “PHP composer” and select “read_api” permissions. You get a new token, which you now can use within Composer config.

It is necessary to define the username and the access token for your Gitlab account, to provide access to the repository:

composer config gitlab-token.username "your GitLab username"
composer config gitlab-token.gitlab.yourserver.com "generated token"

Here you could also add –global or leave it and define the token only for the current project. The lines above should generate a file auth.json within your current project:


{
"gitlab-token": {
"username": "your GitLab username",
"gitlab.yourserver.com": "generated token"
}
}

Now you need a prepared repository on “https://gitlab.yourserver.com/user/project.git” (the library project). On the top level of the master branch there must be a composer.json file, which should not contain a version number, but a valid “name” property like (and “require” and “autoload” sections):


{
"name": "company/private_library"
}

The possible versions of your library will be extracted from the tags or branches of the project. Some Information about versions you can find on the composer website. The simplest way is to generate a tag of your latest commit and name it like “v1.0.0”. Now it is possible to define the library repository as a requirement within your current project:


{
"require": {
"company/private_library": "1.0.*"
}
}

You can use the version handling of Composer, if your tags will have valid version numbers. It is also possible to use stability constraints like “stable” or “dev”, use it within your tag name like “v1.0.0-dev”


{
"require": {
"company/private_library": "1.0.*@dev"
}
}

A following composer update should clone the repository into your vendor directory and the autoloader can provide the library project classes.

Center Panel on Screen

To display a panel on the screen you often use such code:

RootPanel.get().add(myPanel);

I need a panel, which will be displayed on the center of the browser window. To get this, I create a div within the HTML page, which loads my GXT3 application:

<div id="gxt-app" class="center">

Within the GXT application I reference this div now:

RootPanel.get("gxt-app").add(myPanel);

I don’t know, how the size of myPanel is, so we have to create a little CSS snippet to calculate the size and move the div into the center of the browser window:

.center {
position: fixed;
top: 50%;
left: 50%;
transform: translate(-50%, -50%);
}

Install GXT Development Environment

1. Download and install an JDK7+
2. Download Eclipse 4.5 (Mars) as J2EE bundle
3. uncompress the TAR into a folder, where the developer has access
4. start Eclipse

Maven

1. Download and install Maven in the same version as delivered with Eclipse
2. add M2_HOME, MAVEN_OPTS and JAVA_HOME to ~/.profile
3. create a file settings.xml within ~/.m2 folder

Within Eclipse:

1. Open Marketplace and install Subversive 3.0.0 and Eclipse Color Theme 1.0.0
2. Open Marketplace and install Google Plugin for Eclipse 4.3 (4.5 doesn’t exist?)
3. open SVN perspective and download all SVN Connectors
4. Install SCM connectors in the m2e Marketplace (i.e. m2e for Subversive)

I use Native JavaHL 1.8.14 as connector, you have to install “javahl” on your operating system. Set the connector within the Preferences->Team->SVN. Set svn+ssh, which will use the local .ssh/config file.

5. Configure your SVN repository within Eclipse
6. checkout the Master project as Maven project
7. Checkout the Server parent project as Maven project (you need the m2e connector to get the context menu item)
8. Checkout the UI parent project

9. change the presentation of the Project Explorer content to hierarchical.

Operating System

1. Download Glassfish 3.1
2. Install it into an empty folder, which is user-accessible

Eclipse

1. Create a new server
2. Server-Type Glassfish 3.1 (download additional server adapters if necessary, Preferences->Server->Runtime-Environments)
3. Use settings from Glassfish installation (admin, domain, ports)

Operating System

1. Download the GXT version which match the current GWT plugin version (GWT 2.6.0 -> GXT 2.3.1.a)
2. create a named user library for the GXT version and link it to the downloaded JAR files
3. add the user library to the project build path (UI project)

Use SSH keys

To access an SSH server you should always use keys instead of simple passwords. Generate your keypair with PuttyGen and save your private and public key part. On Windows you can use the private part with PageAnt to provide access to the SSH server without entering a passphrase. On the SSH server store your public part within the .ssh/authorized_keys file. But don’t use the Putty-generated public part, you have to copy and paste the OpenSSH format of the public key from the PuttyGen window.

If you need your private key on a Linux client to access the SSH server, you cannot use the Putty-generated private part. You will also need an OpenSSH format. This format you can export with the menu Conversions -> Export OpenSSH key. Store your OpenSSH key as id_rsa or id_dsa file and put it into the .ssh folder of the user. Both files will be used by the SSH client (the possible file names you can find on /etc/ssh/ssh_config as IdentityFile property). If you cannot use these file names, you can also store the private key with another name, but you have to define a config section for the SSH server in ~/.ssh/config:


#
# default:
# .ssh/identity
# .ssh/id_rsa
# .ssh/id_dsa
#
host name_ssh_server
Hostname full-qualified.ssh.server.name
Port 22
IdentityFile ~/.ssh/you_own_private_key_name
ForwardX11 no

You can now access the server “name_ssh_server” with

ssh username@name_ssh_server

which will use “full-qualified.ssh.server.name” on port 22. The private key file is accessible on ~/.ssh/you_own_private_key_name (file permissions 600!) and should match with an authorized public key on the SSH server.

Auto adjust Grid

If you have a Grid within a Panel or Window class and the Grid will not be automatically adjusted, you will have to check the complete widget hierarchy for valid LayoutManagers. All parent widgets of the Grid must use the layout sytem. Then we can use

  grid.getView().setAutoFill(true);
  grid.getView().setForceFit(true);

The parent Panel or Window should define an minimal height and width.

  window.setLayout(new FitLayout());
  window.setMinWidth(500);
  window.setMinHeight(400);

Every resize operation on the Panel/Window should resize the Grid too. If you forget the layout on the window or its panels, the grid will not be displayed till you set a height and width explicitly.

Wrong charset with GWT Dev-Mode in Eclipse

If you use .properties files to define the application strings, you will run into a strange behaviour of the GWT Dev-Mode in Eclipse.

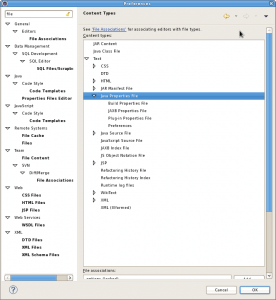
All .properties files have a default charset of ISO-8859-1. You can see that on your global preferences:

eclipse-prefs

If you write your text, it will be encoded into ISO-8859-1. Now the internal Jetty sends HTTP responses with a charset ISO-8859-1, your text will be unchanged. But if the browser displays the website in UTF-8, all of your texts have the wrong charset (i.e. German umlaute will be wrong). There is no config option to change the behaviour of the Jetty, but you can set the default charset of the .properties files to UTF-8. Then the HTTP responses will change your text encoding, but the browser will change it back to the right charset (set Content-type UTF-8 within your index.html!).

Set focus on a textfield to prevent validation

In the SignInWindow of the trial registry the login textfield has always a red border, because it executes the validation (must not empty) too earlier. So it is necessary to set the focus on that textfield, if we open the window. The following code is copied from the Sencha forum:

Window window = new Window();
window.setWidth(400);
FormPanel formPanel = new FormPanel();                 
                
TextField<String> passwordField = new TextField<String>();                
passwordField.setFieldLabel("xyz");
passwordField.setEmptyText("abcd");
passwordField.setAllowBlank(false);    
passwordField.setMaxLength(255);
passwordField.setPassword(true);
// passwordField.focus(); - Comment this
                
formPanel.add(passwordField);
window.add(formPanel);

window.setFocusWidget(passwordField); // Added this line
window.show();

It doesn’t work to set focus() on the textfield, it is better to let the window decide that.

GXT webdesktop – no background image

If you don’t see the background image of your Desktop, your website probably don’t load the associated CSS files. First at all, you have to include the CSS into your start page:


<link type="text/css" rel="stylesheet" href="gxt-2.2.5/css/gxt-all.css">
<link type="text/css" rel="stylesheet" href="gxt-2.2.5/desktop/css/desktop.css">

Start your appliaction in Development Mode, and open the start page in your browser. If there isn’t the background image visible, you should check your page with a debug-tool like Firebug. Navigate to the CSS link (mostly in <head>) and try to open the link. If the file could not be found (you can not see the CSS definitions), your GXT resources are not available within the application. Copy the necessary files into your WAR or in your deployment directory.

PhoSCo.info Server

The server is up and running!

Greetings

André