Blog Archives

Code Formatter Eclipse

Today I had the problem, that I had installed a new Eclipse on my workstation, but I forgot the code style configuration at home. I tried to connect per SSH, but I have no X server on the machine at home. So I cannot run Eclipse to export the configuration as XML. But there is a simple solution for that, copy the information from the right configuration file.

You can find the formatter profiles in the file

/.metadata/.plugins/org.eclipse.core.runtime/.settings/org.eclipse.jdt.ui.prefs

There is a very long line starting with org.eclipse.jdt.ui.formatterprofiles, which you can copy to your local installation. Close your Eclipse and restart it after the change and you will find the new formatter in the drop-down-list within the preferences.

The better way would be to export the formatter definitions as XML within Eclipse and check-in the file into your Subversion/Git.

Use keywords with SVN

You can use keyword replacement with Subversion. A good tutorial is available on http://www.startupcto.com.

Eclipse, Windows and Subversion

Yesterday I had to use Windows with Eclipse and I needed access to our Subversion repository. But we use SSH with certificates and I had a lot of trouble to get a working system. At the end I have installed TortoiseSVN and PLink to test the access.

First use PLink and check the access to your Subversion server. The certificate can reside within a running PageAnt or you can set the local path to your private key direct in the command-line.


"c:\program files\plink.exe" -2 -P <port> -noagent -i "H:\\keys\\subversion.ppk" user@server

This should create a connection to the user account on the Subversion server. You have to set double backslashes within the key parameter, because PLink is a Unix program, which uses backslash as escape character for the following character.

An alternative will be:

"c:\program files\plink.exe" -2 -P <port> user@server

if you use PageAnt and your certificate is imported there (you should look twice!). If you have a working connection, you can close it and now open TortoiseSVN->Settings. You will find a button, which lets you open the configuration file for Subversion.
TortoiseSVN settings

TortoiseSVN settings

In the configuration file define your own [tunnel] entry, which you can use as protocol extension. In example, you define a [tunnel] named as “work”, you can access the repository with:


svn+work://user@server/repository-path

Open the configuration file and scroll down to the [tunnels] sections. Now you can define:


work = "C:\\Program Files\\PLink.exe" -v -2 -P <port> -i "H:\\keys\\subversion.ppk" -noagent

You have to use double backslashes also for the program path to PLink, because TortoiseSVN uses also the UNIX notation. Now You can test the [tunnel] with your TortoiseSVN installation. Open your repository browser and enter the Subversion Uri as described above. Some command windows will be open, this is a side effect of PLink. If you can see the repository tree, we should test it without the explicit key notation and work with PageAnt.


work = "C:\\Program Files\\PLink.exe" -v -2 -P <port>

If the [tunnel] works again (PageAnt should run and the key should be imported), we replace the PLink with the TortoiseSVN internal variant, which is called TortoisePLink. This program doesn’t open a command window.


work = "C:\\Program Files\\TortoiseSVN\\bin\\TortoisePLink.exe" -v -2 -P <port>

Test it again with the repository browser. If all works fine, we can now open Eclipse to configure a repository there. I have installed Subclipse and JavaHL as connector. Go to Window->Preferences->Team->SVN and you can see the client “JavaHL (JNI)” with a specific version number. I’m not sure, whether or not Eclipse loads the Subversion config file from the Tortoise installation as default. So I have changed the location to the config file, which we have modified above. Normally you can find it within “C:\Documents and Settings\\Application Data\Subversion”. Check the content of the config file there, it should contain your [tunnel] definition.

Back to Eclipse, save the settings and open the Subversion perspective. Add a new repository and use the Uri:


svn+work://user@server/repository-path

That’s all.

Code Formatter Eclipse PDT

You can download a cool extension from http://sourceforge.jp/users/atlanto/pf/eclipse/files/ which allows you to define the code format for your PHP code. Install the .zip-file as archive with Eclipse’s “Install New Software…” feature.

Log file of the Eclipse workspace

All errors are logged within


${WORKSPACE}/.metadata/.log

Here you can see ClassNotFoundExceptions and timeouts of I/O operations (like Maven index download).

Execute JerseyTest case within Eclipse

If you execute a test case within Eclipse, it is possible to fail already on the build of the WebDescriptor. You should add

-Djersey.test.containerFactory=com.sun.jersey.test.framework.spi.container.external.ExternalTestContainerFactory

to your Debug/Run configuration to test against the deployed WAR on the Glassfish server, which runs within Eclipse. Normally the init process of the JerseyTest should find a factory class, if it is within the classpath. The pom.xml contains a dependency to something like

<groupId>com.sun.jersey.jersey-test-framework</groupId>
<artifactId>jersey-test-framework-external</artifactId>

which provides the ExternalTestContainerFactory. But Eclipse could not find it and got a NPE on startup of every test case.

Change Maven repository directory within Eclipse

If you use the embedded Maven installation within Eclipse, the default .m2 directory (which contains the repository) resides in the profile of the current user.

In Windows, this is the C:\Documents and Settings\<user> directory. A large repository there could result in problems with server based profiles. Is there a quota on the server, it could be not possible to save the profile back to the server, if it contains a lot of Maven artifacts.

You can set the repository directory within the settings.xml. Copy the .m2 directory into another path on your computer (outside of your profile). Edit the settings.xml and set a new path to your repository:

  <!-- localRepository
   | The path to the local repository maven will use to store artifacts.
   |
   | Default: ~/.m2/repository -->
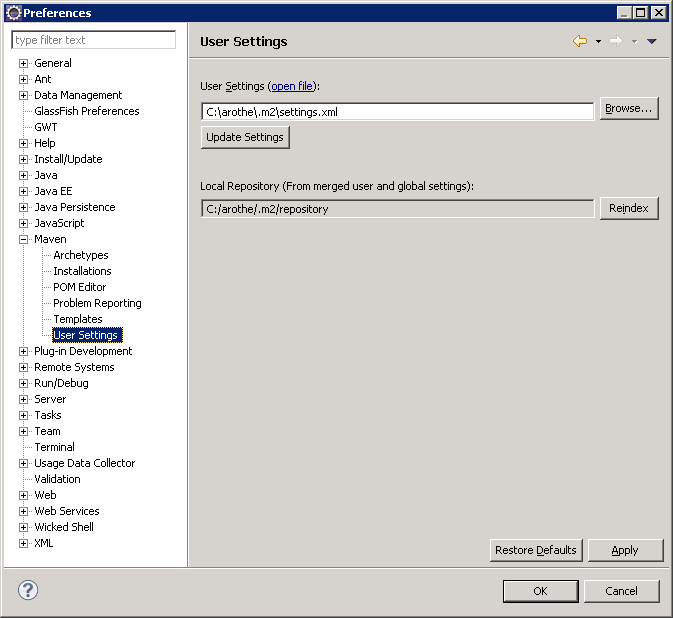
  <localRepository>C:/arothe/.m2/repository</localRepository>

Enter Eclipse Preferences and change the User Settings path. Click on “Update Settings” and the Local Repository should be changed to the path defined within your settings.xml. Click on “Reindex”.

Eclipse Maven Settings

Last but not least, delete the .m2 folder from your profile directory.

Use a simple shell within Eclipse

The WickedShell project provides a shell view within Eclipse to execute some scripts or programs. It is very simple to execute a Maven build within this shell instead of opening a terminal window from the Linux desktop. Very cool!

http://www.wickedshell.net/

Problem with DescriptorEventAdapter and EJBContext

If you have an AuditListener for your EclipseLink entities, you may have a problem to get the name of the current user at this level. You could use the InitialContext.lookup("java:comp/EJBContext") method, but it fails on my application. Another way is to use a servlet filter.

Define a filter class within your web.xml:

	<filter>
		<filter-name>PrincipalServletFilter</filter-name>
		<filter-class>de.uni_leipzig.smo.acltest.server.filter.PrincipalServletFilter</filter-class>
	</filter>

	<filter-mapping>
		<filter-name>PrincipalServletFilter</filter-name>
		<url-pattern>/*</url-pattern>
	</filter-mapping>

Implement a singleton enum, which stores a ThreadLocal variable to hold the current principal object.

public enum PrincipalSingleton {
	INSTANCE;

	private ThreadLocal<Principal> principal = new ThreadLocal<Principal>();

	public Principal get() {
		return principal.get();
	}

	public void set(Principal user) {
		this.principal.set(user);
	}
}

Set the current principal within the filter.

public class PrincipalServletFilter
	implements Filter {

	@Override
	public void destroy() {
	}

	@Override
	public void doFilter(ServletRequest request, ServletResponse response, FilterChain chain)
		throws IOException, ServletException {
		PrincipalSingleton.INSTANCE.set(((HttpServletRequest) request).getUserPrincipal());
		chain.doFilter(request, response);
	}

	@Override
	public void init(FilterConfig config)
		throws ServletException {
	}
}

And finally use the principal within your audit class.

	private Principal getPrincipal() {
		return PrincipalSingleton.INSTANCE.get();
	}

Adding a web-server’s certificate to Java’s keystore

When you try to connect a secured website, you will need the server’s certificate within the keystore of Java. If you don’t have it, you will get a sun.security.provider.certpath.SunCertPathBuilderException because of an invalid handshake between server and client.

To solve that task, you can get the certificate from a webbrowser (like FireFox). Open the page security properties and export the certificate as *.PEM (Base64 encoded DER certificate) without the certification authorities. Store the file into your filesystem on <cert-path>.

Check your Java installation and login as user, which has write access to <java>/lib/security/cacerts.

Execute
keytool -import -file <cert-path> -alias <cert-name> -keystore <java>/lib/security/cacerts

The <cert-path> is the path to your saved certificate, <cert-name> is an alias for the certificate, you can use the webserver’s domain. The default password of the keystore cacerts is changeit
You will get the information about the certificate and at the end answer the question with yes.

If you have already used the alias within the keystore (i.e. with an old certificate), you can use

keytool -delete -alias <cert-name> -keystore <java>/lib/security/cacerts

to remove the old certificate.

Now, the Java application is able to connect the secured website. Double-check the used installation, sometimes your application uses its own JRE or another version on your filesystem.